We bring you a list of 42 features of Windows 11, with which we want you to have the tools to fully master the operating system. With them, you will learn to master the new and old Windows features, and also to use other features that are a little more hidden or less known.
The idea is that if you are using Windows or Windows 11 for the first time, you have the tools to be able to master its functions and take advantage of it. Also, we want to try that if you are an advanced user you can discover some new things on our list.
And if you are an expert in Windows 11 and there is a good trick that we have missed, we invite you to share it with everyone in the comments section.Thus, users with less knowledge can also draw on the knowledge of our Technoeager.
Put the start menu on the left
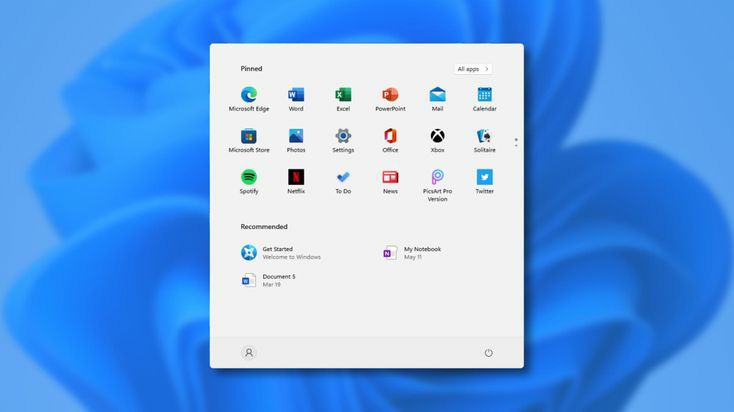
The main features of Windows 11 is the change in your start menu. Not because it gets rid of the tile system that we had seen in Windows 8 and Windows 10, but because from now on you have it in the center of the screen. But if this latest change bothers you, you can move the start menu back to the left of the taskbar to have it where it has always been.
- To move the start menu to the left, go into Windows settings.
- Inside, click on Personalization.
- Within the customization options, click on Taskbar.
- Here, click on the Behavior section of the taskbar.
- Tap on Alignment on the taskbar, and switch Centered to choose the Left option.
Configure the start menu by pinning apps
And if you want to customize Windows beyond its dark or light mode, in Personalization you will find a small repertoire of themes, which are designs to configure Windows, with backgrounds, sounds, colors or even different mouse pointers. Several come pre-installed so you can play with them.
And if that’s not enough, you have a Themes section where you can customize them on your own and then save it as your own theme. You even have an Explore themes button, which opens the themes section of the Microsoft Store to download others made by different users, which can be free or paid.
Use the hidden index of your list of all apps
If you have many applications installed, looking for a specific one if you do not remember the name can be a mess. But there is a little trick. There is a heading with each starting letter for the applications, and if you click on this heading you will access an index, in which you can choose the letter you want to see only the applications that start with that letter.
Home menu folder list
In the start menu, at the bottom right, you have the button to shut down or restart the computer. Well, you should know that you can place shortcuts to folders on this site, so that you have very quick shortcuts to enter the download folder, the music folder or others.
- Open Windows settings, and click on the Personalization section.
- Once inside, click on the Start section.
- Inside, click on the Folders section.
- Here, you can activate the folders that you want to appear.
Disable start menu suggestions
Within the Start section in the Personalization section of Windows settings, you will also be able to deactivate the recommendations of the start menu. Thus, you can prevent direct access to the most used applications or the most used or most recent documents and files from appearing.
Put Windows 11 in dark mode
There are two types of users in the world of operating systems, those who prefer light themes and those who prefer dark themes. Microsoft not only allows you to use the one you want of the two, with or without transparencies, but it also has versions for light and dark modes of its official wallpapers. Come on, you can activate the dark mode knowing that it will be well adapted.
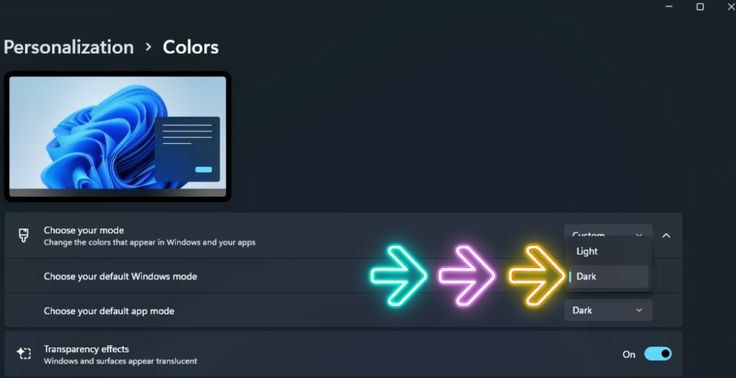
- Go into Windows settings.
- Inside, go to Personalization.
- Within the customization options, click on Colors .
- Click on the button Choose your mode, and select the light or dark.
- You can also customize it to choose light and dark elements.
- You can enable or disable transparencies on the tabs.
- You can also choose the accent color, which affects, for example, the indicator of the app you use in the bottom bar.
Use its split screen modes
One of the great feature of Windows 11 is its split screen system where you have different configurations to order the applications you have open. You can do the typical split screen of half and half, but you also have other configurations to organize two, three or four applications.
All you have to do is hover your mouse pointer over the full screen button that appears in the upper right corner of a Windows window. A window will be displayed with the different options that you have available, and you just have to click on the side where you want to place the application in which you are within the layout you choose.
Customize Windows with its theme system
And if you want to customize Windows beyond its dark or light mode, in Personalization you will find a small repertoire of themes, which are designs to configure Windows, with backgrounds, sounds, colors or even different mouse pointers. Several come pre-installed so you can play with them.
And if that’s not enough, you have a Themes section where you can customize them on your own and then save it as your own theme. You even have an Explore themes button, which opens the themes section of the Microsoft Store to download others made by different users, which can be free or paid.
Use the dictation function
There is a slightly unknown function, but that can be useful when you want to write and do not feel like typing. This is the dictation function. Press the Windows + H keys on your keyboard at the same time and the dictation function will appear.
Now, you just have to press the microphone icon and speak so that Windows understands you and writes what you say.In addition, if you enter the configuration of this function you will be able to activate automatic scoring. With it, Windows will listen to your pauses when speaking, and interpret them to put commas and periods in the text that you write for you.
Shake the window of one app to minimize the others
This is a very curious function. You can activate an option so that when you “grab” the title bar of an application with the mouse and shake it, the rest of the windows you have open are minimized without you having to do anything else. It is something that can be comfortable when you have a lot of windows open and you want to shake all but one.
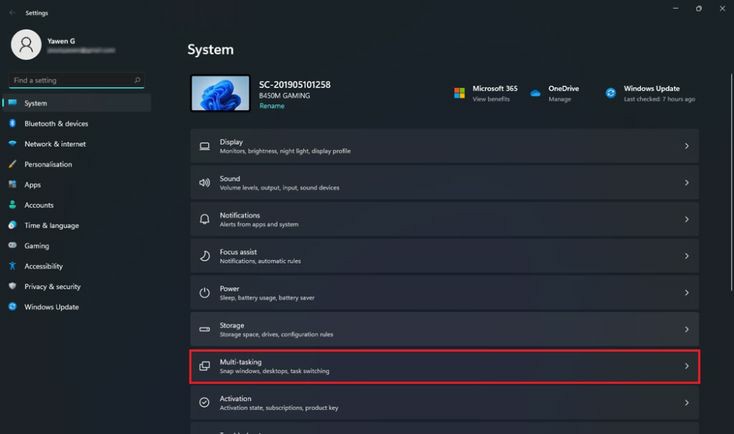
- To activate this option, go to Windows settings.
- Inside, see System.
- Now, go into Multitasking.
- Scroll down to the option Shake title bar in windows and activate it.
Access the old Windows 10 right-click menu
Windows 11 changes the context menu for the first time in a long time. This means that when you right-click on an item, the menu that appears is new, and it is missing many things that the Windows 10 context menu did have.
Fortunately, you always have the option to explore that other menu with the rest of the options.All you have to do is, when you right-click on an element, click on the Show more options option, which is the last one that appears in the context menu. This will open the menu that we have been seeing in the rest of the versions with more options.
Change the screen refresh rate
Imagine that you have a 120 Hz screen, but for whatever reason you want to leave it at 60 Hz. Perhaps so that it consumes less battery in the case of a laptop, for example. Well, this is a setting that you can change by hand. All you have to do is enter the appropriate settings, which is a bit hidden.
- To activate this option, go to Windows settings.
- Inside, see System.
- Now, go to Screen.
- Here, find and press the Advanced Screen option. It’s almost all the way down.
- You will enter a menu where you only have to display the options to Choose an update frequency.
One terminal to dominate them all
Until now, to change settings using commands in the Windows terminal, you had to decide between using PowerShell or the command prompt. Now this is over, Windows has launched a Windows Terminal application where you can open either one in multiple tabs.
Simply search for the Windows Terminal application. When you enter, you can add different tabs. By default, only one type will be added, PowerShell, but in the down arrow button next to the new tab button you can also choose that the tab is a command prompt or Azure Cloud Shell.
Record what happens on the screen
Just like Windows 10, Windows 11 has an internal screen recorder that you can use to record anything you do in an application or window. You will not be able to record the screen on the desktop or file explorer, but you will be able to record what you do anywhere else.All you have to do is press the Windows + G keys on your keyboard at the same time to open the Xbox Game Bar. Inside here, you will have a button to activate the Capture widget, which is the one used to record the screen.
Organize your virtual desktops
The other big step is that you familiarize yourself with the management of virtual desktops in Windows 11. If you press Windows + Tab, you will open the virtual desktops, which will appear below. You can create new desktops or delete the ones you already have created, and each one can be assigned a different name.
Then, you can move between the desktops by pressing Control + Windows + Left or Right, to navigate to the next or previous desktop. The idea is that ** on each desktop you can have different applications, and thus you can separate your work environment from your leisure environment. In addition, in Windows desktop view + Tab, you can drag open applications from one desktop to move them to another without closing them.
Different wallpapers on each desktop
Finally, you should know that in Windows 11 you can put a different wallpaper on each desktop, so that the contexts of each one are more marked or differentiated thanks to this background. Thus, they will not all look the same, and you win the power to have different decorations on each of them.To do this, you simply have to right-click on the desktop wallpaper, and in the menu that will appear, click on the customization option. There you can choose a specific wallpaper for that desktop.
Decide which apps issue notifications
All the applications you install will be able to send you notifications. But it may always be that those of a specific one are too repetitive, or that you prefer that they be seen but do not emit sounds when it comes to those of a certain application. For that, you can configure Windows 11 notifications to suit your needs.
- Go into Windows settings.
- Go to the System section.
- Hit the Notifications option.
- If you go down a bit, you have the list of your installed applications.
- When you click on one of the apps, you can separately configure how its notifications are.
Quick settings from the notification itself
You should also know that there are some changes you can make from the notification itself. When one appears, click on the three-dot button and a small menu of options will appear. It is a small menu, but from it you can deactivate all the notifications of the app that sends it, or give it a higher priority. You can also enter to configure the notifications of the app.
You can reply from the notifications themselves
There are some notifications that are interactive, such as those from messaging applications. If the developers of those apps have worked on it, you will see that you can respond from the notification itself in a writing field that is in them.
There will be other notifications that you will not be able to respond to, but you will find different ways to interact with the content in them. For example, in the mail application you will be able to archive, discard or set a mark on the mail that has reached you.
Use the concentration assistant
Another option for notifications is to use the concentration assistant. This allows you to configure moments or hours in which you do not want notifications to appear, or at least not to appear those that are not important. When you go into the concentration assistant settings, you will have three different options.
You can keep it disabled, which is as it is by default, but you can also enable it so that it only shows notifications of high priority or none except the alarms of the operating system.You can also activate a summary, so that when you remove this assistant you can see the notifications that you have missed.
Just activate the mode you want to use. In addition, you can configure it to choose specific hours at which it is activated, or to do so when you open any application. Thus, if for example you open a game, you will make sure that there are no notifications bothering you.
Customize your widget panel
After several experiments in Windows 10, Windows 11 has created a widget menu that you can call from its button on the taskbar or by pressing the Windows + W keys on your keyboard at the same time. A window will open on the left side of the screen with various widgets in which you can see different types of information.
It is very similar to the iOS widget screen, and you can click the Add widgets button to add others that you like. In addition, each widget will have a configuration button to modify it, and in some cases such as the news widget, you will even be able to interact with each element within it.
See which applications are consuming the most resources
Sometimes our computer is slow and we do not know exactly why. Often this is because an application is working too hard. Fortunately, for several versions of Windows this is something that you can check by entering the task manager. For that, press Control + Alt + Delete and choose the Task Manager option on the screen you go to.If a small window appears, click on More details to enlarge it.
There, in the processes tab, you will be able to see everything that is working on your computer, and in each application or process you will see different percentages with the capacity of the CPU or RAM that they are hoarding. Those with higher percentages will be the ones that may be slowing down the computer, especially if they are unusually high percentages.
Prevent apps from starting alongside Windows
Within the task manager itself you have a Home tab. In it, you will be able to see a list of applications, and you will be shown those that have the option to start automatically together with Windows enabled. You’ll also see the impact they have on startup, which means when it’s high, they’ll be making Windows 11 take longer to start up.
The good news is that from the task manager you can disable the startup with Windows of the applications you want, thus being able to speed up the startup and make everything go a little faster when you turn on the computer.
Use the night light to sleep better
Windows 11 has a night light system, which allows you to activate warmer colors on the screen at certain times to help you sleep a little better. Perfect to be able to activate it at night and that the computer does not take away your sleep.
- Go into Windows settings.
- Click on System.
- Now, click on Screen.
- Tap the Night Light function.
- You can decide its intensity and the hours at which it is activated.
Hide your desktop icons

If you are one of those people who has a desktop full of folders and files, you will like to know that you can hide all the icons on your desktop without having to delete them. So, in case you have to share a screen or want to take a screenshot, you will have a quick way to hide your clutter.
- Right click on the wallpaper.
- Click on the View option.
- Within the menu you go to, deactivate the option to Show desktop icons.
- By doing this again, you will be able to show them again whenever you want.
Use clipboard history
Copy and paste, every day many of us use this function often. However, by default it is quite limited, since you can only paste the last thing you have copied to the clipboard. Fortunately, Windows 11 has a clipboard history with which you can choose what to paste among the last items you copied.All you have to do is press Windows + V keys instead of Control + V to paste. You will access the history, although the first time you do it you will first have to activate it so that Windows has a little more memory when you are copying items.
Snipping tool when you press Print Screen
When you click the Print Screen button , Windows 11 simply takes a screenshot and saves it to the clipboard. However, there is a way that you can substitute simple snapshots for the Snipping Tool, which allows you to choose the areas of the screen that you want to crop when taking a screenshot.
- Go into Windows settings.
- Click on Accessibility.
- Here, click on Keyboard.
- Now, find and activate the option to Use the Print Screen button to open the screen clipping.
Choose when you don’t want Windows to restart for updates
Sometimes Windows can restart at the worst time to apply the changes from an update. Fortunately, you can temporarily pause updates for a few weeks, or schedule your active hours so that Windows won’t restart on them and end up interrupting you. and wasting your time.
- Go into Windows settings.
- Credit en Windows Update.
- Here you will have the option to pause updates, lasting between one and five weeks.
- You can also click on Advanced options .
- Inside, in Active hours you can program the hours at which you do not want restarts.
Use the file explorer shortcut
Windows file explorer has a bar on the left where you have the most important folders arranged, and you can navigate through them. At the top you have a quick access section where you can pin folders to make them more accessible. For example, I have the downloads and screenshots folders pinned.To add folders to Quick Access, you just have to right-click on a folder and click Pin to Quick Access. This can be done both in the left column and in the main part of the browser. Of course, do not add too many things or it will stop being so useful and it will become chaotic.
Hidden menu of installed apps
Windows has a large number of useful sites within its internal folders, although they are not always easy to access. For example, if the address bar of the file browser write Shell: AppsFolder, you will enter a hidden menu where you can view all your installed applications. There are no folders or subfolders here like in the start menu, so it can be a curious alternative.
Save any website in PDF
If you need to save a web page in PDF , you do not need to install any application or complicate your life too much. Windows allows you to save websites as PDF as an alternative to printing them, and then it also allows you to view these files with your browser, a feature that other alternative browsers like Chrome have also implemented.
- Enter the page you want to save in PDF.
- Press Control + P to open the options to print the web.
- Opens the Destination menu where the printer appears.
- Choose the Save as PDF option .
- Click on the Save button that appears below.
Open multiple instances of the same app
Windows 11 has inherited a little trick from its predecessors with which you can open the same application more than once , and that both instances behave independently of the other. Thus, if there is a task that requires changing any configuration of this application, you can have it open twice to perform it separately.All you have to do is central click on the application icon on the taskbar . Doing so will simply open the application again separately. You can use this method with almost all applications.
Share your internet connection
Windows will also allow you to share your Internet connection. At home you may not need it because with other devices you can connect to the same WiFi, but if you are away from home with a laptop, you can do this to make the laptop create a network and become a router , so that other devices can connect to the same network.
- Go into Windows settings.
- In the left column, click on Network & Internet .
- Scroll down and tap on Mobile wireless coverage zone .
- First, go down to the properties and click on Edit to change the name and password of the network you are going to create.
- Now, go up in this window and activate the Mobile Wireless Hotspot .
Synchronize the calendar and mail from Google, Apple or others
You need a Microsoft account to use Windows 11, and when doing so, the default calendar and mail that you will use in the system are those of this account. But you can also synchronize other third-party email and calendar accounts , so that all that is synchronized in the Windows calendar or mail.
- Go into Windows settings.
- In the left column, click Accounts .
- Tap Email and accounts.
- Hit the Add accounts button and add the one you want.
- When adding the account, you can choose what you want to add.
Translator or calculator from the start menu
When you open the start menu and simply start typing, the start becomes the Windows search function. There you can find many things on the Internet and inside your computer, but you can also do some quick functions such as using the calculator or the translator directly from this search engine.For example, if you press the Windows key and simply start typing a math operation, the start menu turned into the search menu will show you the solution to the operation you type.
The same happens if you use commands like “hello in English”. Here, hello will be the word to use, which can be several, and when you put the command in English, Spanish or whatever, you will ask to translate it for you.
Change Windows sounds
Windows 11 has brought back concepts like the Windows logon sound, which in Windows 10 there was none. There are new sound effects, and others that have been maintained, but you can change all the Windows sounds you want to your liking, and even use your own short wav files or download sounds from the Internet to add others to Windows.
- Go into Windows settings.
- In the left column, click Personalization.
- Now, click on Themes.
- At the top of the next screen, click on Sounds.
- The sounds menu will open, where you can configure the sounds you want from your computer.
- You can save all this as a theme, and then change it to another if you want.
Find the apps that take up the most space
Windows 11 has a number of ways you can clean it up thoroughly by removing items that are taking up too much space or that you don’t need. An interesting criterion when you are going to do cleaning is to delete those applications that are taking up too much space , so that you can use it for other things.
- Go into Windows settings.
- In the left column, click on System.
- Now, click on Storage.
- Inside here you will see the amount of space your applications occupy.
- Click on the Applications and features option.
- You will enter the complete list of apps ordered from the one that occupies the most to the least.
- Those that you do not want to keep you can uninstall by clicking on the three-dot button and choosing the option to do so.
Delete all temporary files with one click
Another option that you will see within the Storage section in Windows settings is to delete the temporary files specifying which ones you want to remove specifically. In the Storage screen you will see the total space that these temporary files occupy, and by clicking on their option you will be able to manage their deletion.
If you click on the temporary files option, you will go to a screen where you can decide what types of files you want to delete . They will be ordered from those that occupy the most space to those that occupy the least, and you will be able to mark all those that you consider appropriate to delete. When you have them marked, click on the Remove files button that you have at the top and that’s it.
Reset the apps
If there are some applications that are malfunctioning or that you want to clean without uninstalling them, you can try to restore or repair the applications to leave them as newly installed. To do this, go to Windows Settings, in the left column click on the Applications section, and inside click on the Applications and features section .You will go to the list of applications installed on the computer.
In it, click on the three-point button of an application and choose the Advanced options option. Within these options, most applications will have the Reset or Repair button, at least the ones you install from the Microsoft Store, and you will only have to click on the reset option.
Manage application permissions
When you install them, the applications require a series of permissions to function. For example, there will be some who need to access the location, and then they can keep collecting that data. Therefore, if you want, you can review each type of permission and deactivate it in the applications where you do not want them to be accessible.
- Go into Windows settings.
- In the left column, click on Privacy and security.
- Scroll down to the Permissions section of the application.
- You will have a list of permissions.
- If you click on one of the types of permissions, you will see the list of apps that require it and you can remove it from the one you want.
Windows 11 is free for beta testing

If you have an official Windows 10 license, Windows 11 will be free. But if you don’t have it or you buy a computer without one, then you will have to pay unless you contribute to the common cause. You will do that by downloading the beta versions by signing up for the Windows Insider program. You will use a Windows in beta state with specific errors, and Microsoft gives you this Windows for free in exchange for being able to record the errors you come across to correct them.
- Go into Windows settings.
- In the left column, click Windows Update .
- Scroll down and click on Windows Insider Program .
- Here you can register.
Shortcuts to some features
During this article we have mentioned the shortcuts to show some of the new features, and now we are going to collect them along with others. This gives you quick access to some of the most useful new features in Windows 11.
- Windows + W: Abre los widgets.
- Windows + N : Open notifications.
- Windows + A : Open the quick settings to configure the brightness of the screen or bluetooth, among others.
- Windows + Z : Open split screen modes.
- Windows +. : Open the emoji selector window of the virtual keyboard.
- Windows + V : Open the clipboard history.

