In Windows 10 it is easy to create a virtual hard disk as user choice. Windows 10 has been in the running for more than 5 years and has become a benchmark operating system. However, maybe you are not too convinced or you have been told about another system that is better suited to you. The point is that you can use them in combination through the physical hard drive of your computer. To do this, you will only have to create a virtual hard disk. Here we will explain how to do it precisely from the aforementioned operating system. Read about best external hard drive here.
What is a virtual hard disk
A virtual hard disk, known by its acronym in English VHD, is an element similar to the physical disk of your computer where you can also store all the files, programs and directories that you want. In general, these drives are also created to be used in virtual machines and simulate the current operating system.
Advantages of creating a VHD
There are several reasons that encourage us to create these virtual hard drives. As we have mentioned, in addition to allowing the use of several operating systems on the same computer, VHDs do not require creating partitions on the physical disk. Therefore, it prevents us from occupying unnecessary space in the system.
The backup of these disks is not complicated at all and, in addition, it is quite easy to delete the virtual hard disk if we want to later. Likewise, a VHD also offers us the possibility of creating dynamic hard drives.
Another of the benefits of virtual hard drives is that they are compatible not only with Windows operating systems, but also with Mac OS and Linux. Likewise, we can access that storage unit from anywhere, we will only need internet access.
Create the virtual hard disk

After having learned a little about the figure of the VHD, now we are going to delve into the process. Through a few simple steps, we will teach you how to create a virtual hard drive in your Windows 10 operating system. The use that we are going to give it later does not influence the procedure.
First of all, we must access the Disk Manager. We can do it with the command Windows key + X or by clicking with the right mouse button on the start icon located in the lower left corner of our screen.
Once here, an advantage will open to us where we will have access to various data: the information of our physical hard drive, the existing drives, their capacities and the file system. Now is the time to select the physical hard drive from which you will generate the virtual hard drive. Once you have clicked, click on the Action option from the menu and choose Create VHD.
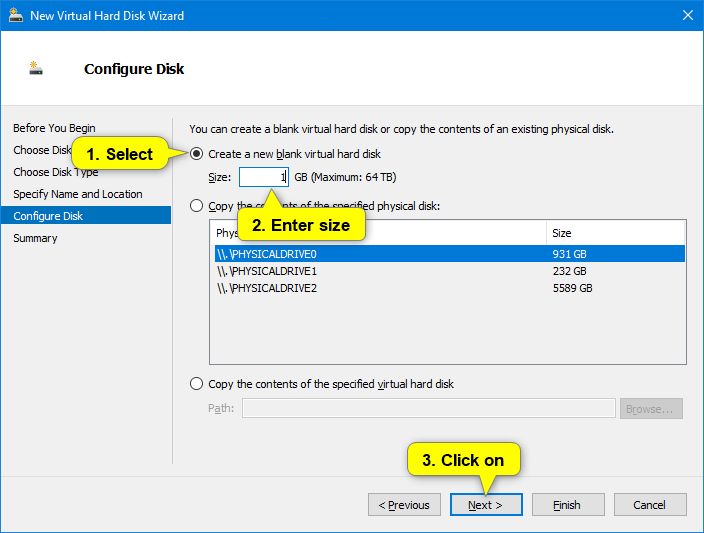
A new emerging advantage will appear next. It is time to choose the location where you will store your virtual hard drive. Click on Browse and then give the VHD an identifying name. We will also have to choose the size of the disk, always taking into account the use we are going to make of it.
Here we can also choose the format and type of the virtual hard disk. The two options are perfectly described in the window. In this case, we will opt for a VHD format and a fixed-size hard drive, which is the recommended option. Finally, we click OK and wait for the disk to be created. Depending on the size, it may take more or less time.
Once this phase has concluded, we return to the Disk Manager. The new VHD will appear alongside the rest of the disks. Now is the time to start it. To do this, click on the disk option (Disk 1) with the right button of our mouse and select initialize disk.
We will get another pop-up window and it is time to mark the options to determine the type of boot we want in our VHD. Choose MBR as the classic option and click OK. Again you have to go back to the Disk Manager interface. Right-click on the unassigned element of the new VHD (marked with a black bar) and select New Simple Volume.
Now a wizard will be executed that we must complete. We choose the size of the new volume, then we assign the letter to this unit, then we format the virtual disk and mark the option Enable file and folder understanding. Here we can also assign a name to the virtual hard disk.
We click next and a window will appear where a breakdown of the configuration that we have chosen throughout the process will appear. First of all, make sure you have chosen the correct settings in the wizard. If you’re not sure, you can go back and check it out. Finally, click Finish to run the selected options.
The virtual hard disk will now be running and ready for use. So go to Windows Explorer, where you can see that the drive is already available. It will appear with your name, size and assigned letter.
Eject the virtual hard drive
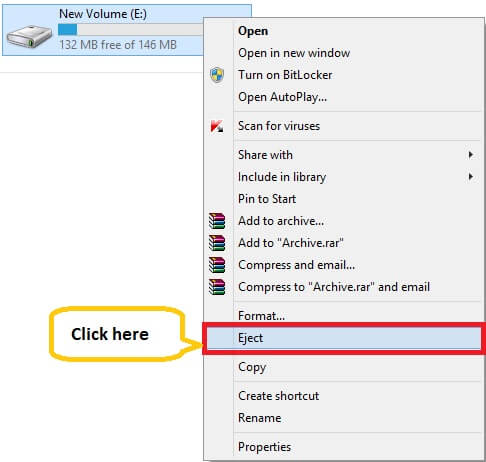
After you’ve created the VHD, you can eject it. You just have to access Windows Explorer again and right-click on the unit. You select Eject.
You can also reassemble it whenever you want. To do this, go to the path where you saved the virtual hard disk, check the Mount option and it will be operational again. It can be lightened by directly double clicking on the VHD drive.
Delete the virtual hard disk
Despite the good use that you can give to the new storage unit, you can delete it if you need it at any given time. To do this, access the Disk Manager again (command Windows key + X or right click on the Windows start icon). Right-click on the created hard drive and select Delete volume.
Here a window will appear that warns us about the risks of this process, which are the loss of all data stored in the VHD. Therefore, it is advisable to make a backup copy of the information stored here.
After hitting yes, we will see that the album is still present. Right-click on it (Disk 1) and click Hide VHD. Next, the path where we previously saved the disk appears. Finally, we click OK.