Online Streamers can use OBS Studio to record and edit videos. OBS Studio is one of the programs that Twitch recommends to broadcast live. But it is also an essential software for anyone who wants to record and edit videos for YouTube. It’s free, it’s open source, and it’s easy to use. We explain how OBS works to transmit video over the Internet or to save it.
What is it and what is it for?
OBS Studio or Open Broadcaster software is a computer screen recording program or a streaming program, for example. It is one of the most used and recommended by YouTubers or by streamers on Twitch, for example. But beyond video gamers or content creators on these platforms it also has all kinds of interesting functions for anyone who wants to record the content of their computer screen and use it for something, from marketing presentations to classes in schools and institutes.
With the rise in popularity of Twitch, OBS has become a must-have software for anyone looking to succeed on the platform. It allows more options than Twitch Studio and is designed for more experienced users who want to add extra tools, audio mixers or different broadcast sources, as we will see in the next paragraphs with their characteristics.
OBS Studio is completely free. It is a software free and code open that you can download without any cost.
Uses of OBS

There are two options for using OBS Studio: to record or to broadcast. You can broadcast live with maximum control of scenes, sources and transitions whether you want to show how you play on the computer or simply if you want to chat for the popular “Just Chatting” category on Twitch. But it also allows us to record videos so it is also a recommended option for youtubers who want to record a gameplay or simply prepare a video with reactions to any type of content.
Beyond gaming you can also use OBS Studio for other interesting uses such as tutorials in which the computer is needed thanks to the fact that you can choose the screen input and explain everything that happens, for example. From a generic tutorial of a program or a website to presentations for institutes, for schools, for companies. You can use it to give talks to form free and burn them later to upload to a particular platform, for example.
Characteristics
There are all kinds of tools and features that we can use in streaming or screen recording software. Some of those that exist are:
- Capture and mix in real time
You can capture and mix sound and video in real time with high quality, as explained from their website. You can go from one scene to another through transitions of your choice and with a simple change suitable for the less experienced.
- Filters
You can use color corrections, adjustments, or color masks for the video sources you use. You can improve the quality of the image if there is something you do not like.
- Audio filters and mixes
The audio mixer, which we will show you in the next few paragraphs, is easy to use and intuitive with all available sources, with the possibility of silencing external noise or having an easy-to-use balance for any user.
- Lots of settings
Easy to use and manage configuration and adjustments from the user panel. We can organize the recordings or choose what we want shortcuts or shortcuts that we need to always have at hand on the main screen.
Download OBS Studio
You can use it on any computer, regardless of its operating system.

- Windows
You can download OBS Studio for Windows compatible with Windows 8, with Windows 8.1 and with Windows 10. Just go to the OBS website and in “Download” choose the “ Windows ” option so that the .exe file is automatically downloaded and you can start to use it to broadcast the content you want live.
- macOS
On computers with Apple’s operating system, you can download them as long as the version you have is equal to or greater than macOS 10.13 . As in Windows, just go to the download page and touch the corresponding button to have the software ready on your computer and start using it.
- Linux
You can download OBS Studio for Linux also from the OBS Project download page and it does not indicate any minimum requirement to be able to have it on your computer.
How to use OBS Studio
We can use OBS studio once we have installed it, OBS will ask us what you want to use the program for:
- Optimize for streams, recording is secondary
- Optimize for recording only, I will not stream
- I will only use the virtual camera
When you choose one of the options, OBS automatically configures the software so that it is ready to use with the best possible settings . It does so taking into account the speed that it detects that you have on the Internet at that moment and the specifications of the computer you are using to transmit so install it in the one you are going to use regularly.
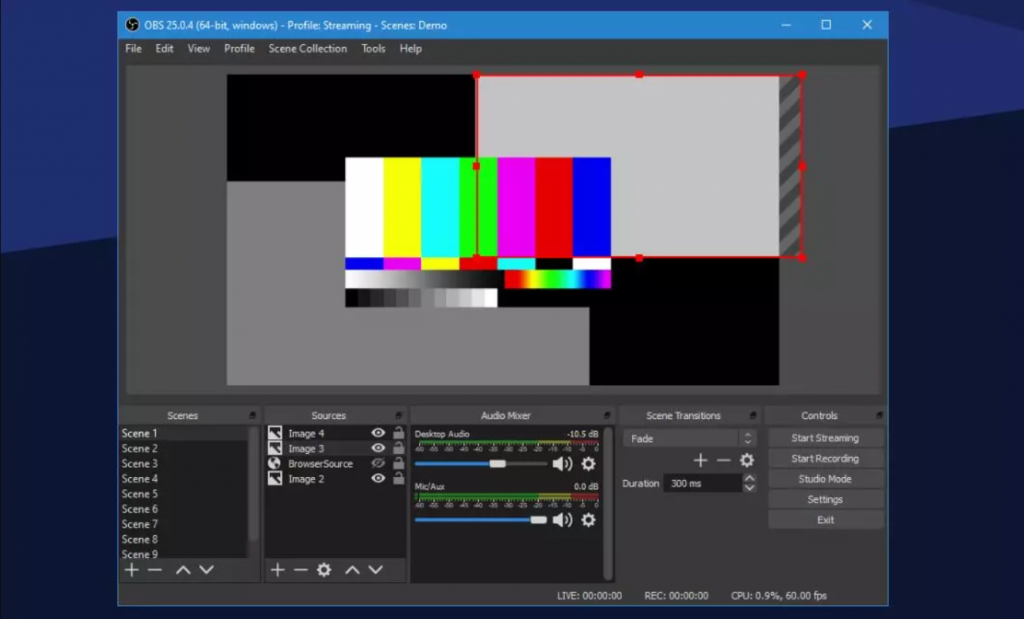
Once the previous configuration is ready, we will be a main screen where the center will appear what we are recording or want to show. At the bottom, five different windows with settings to record or broadcast:
Scenes

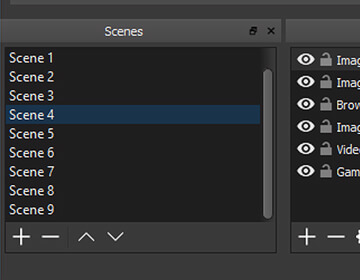
In the first section, Scenes, we can configure what is going to be broadcast on the screen or what we want to change as the video or transmission progresses. We can change from one scene to another, add transitions or simply choose as we need to add, delete. The scenes are what will appear on the screen, what will be seen in the final recording or in the streaming. The end result of using the fonts.
Sources
The sources appear in the second section from the bottom. What are they? They are the different channels from where you can take the video that you are going to show on the screen. It can be a capture of your computer at that moment, your own website. It allows you to choose screenshots, only one window, audio input, image gallery, video capture device, etc.
Audio mixer

As its name indicates and as you can see in the image, what we see right in the center of the lower part of OBS is an audio mixer that allows us to configure which audio input we are using or how much we want the audio input to be. volume if there are several audios at the same time For example, you will see the desktop audio of what is happening on your computer but you can also configure the external one if you add a microphone or a webcam with a built-in microphone.
Scene transitions
The fourth of the five sections is the one on transitions, which allows us to choose how to change from one scene to the other and you can choose the time that this step lasts. In the transitions we find: cut, fade, slide, slide, stringer, color, luma lipe. At the bottom you can mark the thousandths of a second that you want one scene to take to go to another.
Controls
In the last of the five columns we have the one for controls. Basically, here what we can do is start a transmission, start a recording, start a “virtual camera”, open the OBS Studio Mode, access the settings or exit the panel.
Below all the above we will see the details of the broadcast or recording: how long we have been recorded or live and the CPU consumption.

In Technoeager | Top 10 Free Video Editors for Windows 10 PC