We may already know about different graphics card but one may not know to check graphics card on Windows 10. First of all, it must be remembered that a graphics card is one of the components on which the capacity of your desktop or laptop computer will most directly depend when you want to make use of the latest generation games or process images of large resolutions. This card is dedicated to the processing of data related to the video and images that are being played back on the computer.
There are two types of graphics cards, the integrated ones that are coupled to the processor itself as a part of it, and the dedicated ones that you can connect separately to the computer as if they were an external unit on which the CPU can be supported for especially demanding tasks.
When you buy your PC, it is worth looking at a trusted guide to know which graphics card to choose. Anyway, so that you know which one your Windows computer has integrated there are three main ways that you will discover here. There are different ways to check graphics card information on Windows as given below…
How to know your graphics card through the system information
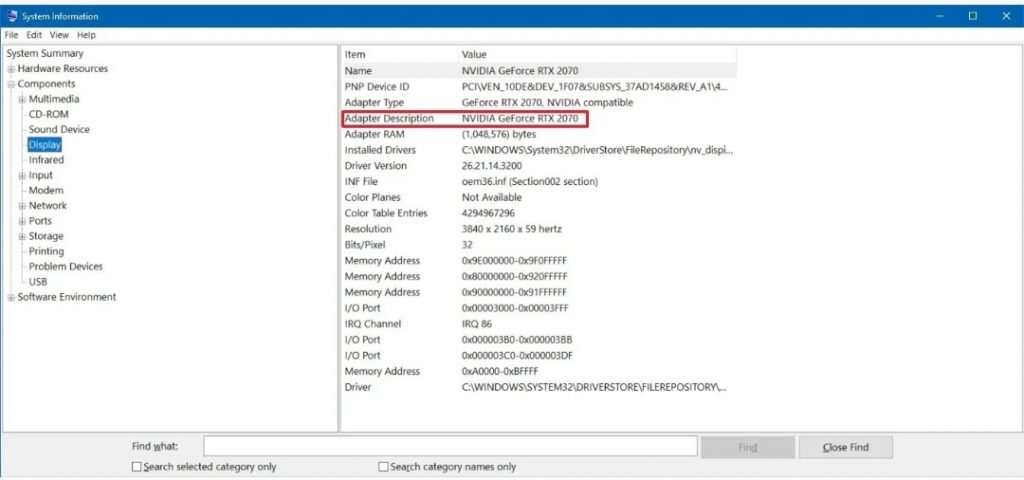
One of the ways to check graphics card information is through the Windows system information. Open the start menu (the Windows window) and type msinfo32 at the bottom, in the search box and the option “System Information” will appear. It will be the only result in this search. Press and you will go to a window with information about your PC : model, brand, processor, operating system and version that you have integrated into it, among many other matters.

On the right of the screen you have several aspects that you can choose from. Go to Components, display the various options and choose screen. By clicking on this, the information of your graphics card will appear in the large box and first.
How to find the graphics card information through a command
If you have a computer based on Windows 10, 8.1 and Windows 7, one way to find out what your graphics card is is to go to the search option and type dxdiag, which will take you to the option of executing the command of that name. Click on that result and it will take you to the DirectX information window. Accept the conditions of the pop-up window that will appear and there you go to the DirectX diagnostic tool.
You will have access to information such as the name of your processor, the speed at which it works, your amount of RAM, the version of DirectX you have installed or your version of Windows 10. And also your graphics card. To do this, in the upper tabs, you must access the second one, which refers to the details of the screen. There you will have the information of your graphics card.
Know your graphics card through an application
There are applications created specifically to be able to check graphics card of your PC. The best known is CPU-Z, a free tool although you can donate some money to the page if you want. Access the CPU-Z official website and click on one of the download links that appear. When it downloads, run the installer and install the app. You can download you can choose between the “setup” version or the one compressed in .zip and you have two languages available: English and Chinese.
You download the application, install it, you must give it the appropriate permissions, as with any program you install, and you can select whether you want to have an icon on your desktop or not. If you decide that it is not on your desktop, note, in the next step, the location where the new program will be.
After installation, the program will take a while to load because it will be collecting technical information from your computer. When you open the main icon it will tell you the technical information of your team. To find out about your graphics card, click on the upper tab of the program where it says “Graphics”.

