We are going to explain how to install Chrome OS together with Windows 10, so that when you turn on your laptop you can choose between using Windows or the Google operating system. And no, we are not going to use one of those GNU / Linux distributions modified to look like Chrome OS, but the original system through one of its recovery files.
It is quite a complex process for inexperienced users, so I do not recommend doing it on a computer where you work unless you really know what you are doing. To be able to do the process, you will need a series of requirements, such as that your computer has the UEFI firmware, the replacement for the BIOS that you should have on your computer if it is after 2011 or 2012.
You will also need a USB of at least 16 GB capacity, as well as install a GNU / Linux distribution on it. This distro will be necessary to perform the conversion of the official Chrome OS recovery file in order to use it as an operating system image. You will also need other things, but we will provide all the links in due course.
There are several processes to install Chrome OS on a computer, but we are going to try one that has already been tested by the community. It is a delicate process in some points, but we will try to explain it to you step by step so that you do not get lost.
First, download the main tools

The first step will be to download a tool called Brunch. This tool acts as a framework that allows you to transform the official recovery of different Chromebooks into an image that will be able to be installed on a Windows PC. To download the tool, you have to go to its official profile on Github.

When you enter the website that we have told you about, you will go directly to the Brunch launches section. In it, you have to download the latest version that has the word stable in the name, since they are the stable versions that give less problems. In it, you have to click on the file with the extension .tar.gz to download it.
Now, you have to download an application to unzip the .tar.gz file. I’m going to use the B1 application, which is the one I’ve been using forever, but there are also good alternatives like 7-ZIP that can help you.

The next step is to download a Linux distribution that is lightweight to fit on the USB that we have told you before. We are going to choose Linux Mint, one of the most popular GNU / Linux distros, so we will go to its download page.

Next, you have to download the Rufus application, since it is the one that we will use to mount the GNU / Linux system on the USB. Just go to the Rufus.ie website and download the latest version available.
Now you have to download a Chrome OS recovery image. In Android, a recovery is the image that all devices have with the essential files of the operating system to recover it in case of a failure, and Chrome OS has it too. Brunch will serve to make this recovery an installable image of the operating system, so now you must enter this website to download the system image.

This is one of the most confusing but important parts of the process, because on the recoveries website you will see that there are a large number of versions, how do you know which one you need? You will see that a code name appears to the left of each recovery, each of which belongs to one or more specific Chromebook models. Here, you will be especially interested in four of the versions, which you will distinguish by their code name, and they belong to Chromebooks with hardware more compatible with normal PCs.
If your computer has a 4th generation Intel processor or later, then you will need to download the latest rammus version from the list. If it’s an older Intel, then lower the rammus. The zork and grunt recoveries, meanwhile, are for the AMD Ryzen 3XXX and the AMD Stoney Ridge. When downloading the recovery, on the right click on the highest number, which will belong to the latest version released.

And finally, you have to download the install.sh script , which you have available in this Google Drive link to download it directly, or in this other link to copy its code and use it yourself if you know how to do it. This script is an executable that will execute in GNU / Linux a series of commands to create the Chrome OS image from the recovery file that we downloaded earlier.
Unzip downloaded files

Now, what you have to do is put the Brunch .tar.gz files, the script and the Chrome OS recovery file in a separate folder so that you don’t lose sight of them or get mixed up with anything else. For example, you can put them both in a folder called Chrome OS. It is recommended that the folder is directly inside C: so that it is easy to find later. In the capture the time on the desktop, but it is only an example, it is best that you tips it in C: using the file explorer.
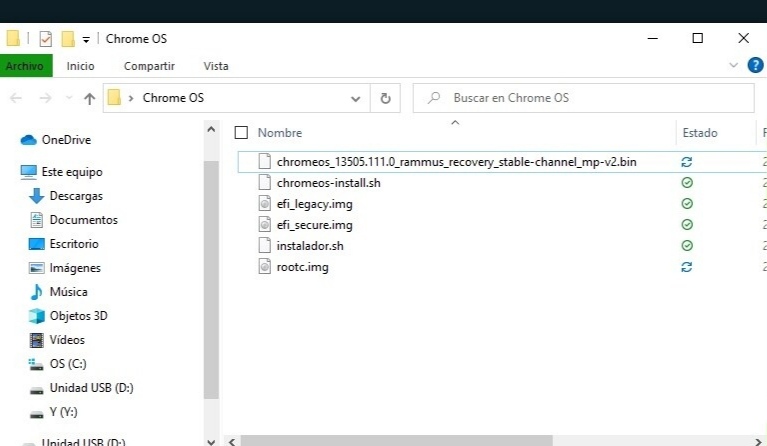
Next, you must unzip the Brunch .tar.gz file and the Chrome OS recovery file into that folder. You only have to unzip the recovery once, but the Brunch one twice. Inside the .tar.gz there will be a .tar file that you will also have to unzip.
Finally, you have to rename the recovery file. It will be called cromeos_blablabla.bin, with numbers and the codename. The file has to be renamed recovery.bin, since that is the name that appears in the script that we have downloaded, and in order not to have to modify that executable, it is best to simply run the file that it asks for.
Make room for Chrome OS alongside Windows

The objective of this guide is to install Chrome OS together with Windows, and for that it is recommended to create a partition on your hard drive to be able to install the operating system on it. To carry out this process, enter the application Create and format partitions of the hard disk that you will see when you type “partitions” in the start menu.

Once you open the disk manager, right click on the C: drive or the secondary hard disk where you are going to install Chrome OS (1). A menu will open with several options about things you can do with the unit, and in it you must click on the Reduce volume option (2). With this option, you will be able to reduce the partition of that hard disk and leave free space to create others in which to host the system.

The process is that simple because usually on the disk you will have a single partition. In the event that you want to install Chrome OS on an already partitioned hard drive, you will have to choose at the bottom the partition that you want to reduce to free up space and choose the option to reduce volume.

A screen will open where you have to choose how much space you want to free from the hard disk partition. The only thing you have (and can) write is the size of the space in MB in which you want to reduce the partition, which will be the same space that you leave free. Above the figure you will see the available space, and below the space that will remain for Windows once you have made the reduction. Once you have decided the amount, press the Reduce button.
After making the changes, the Disk Management application will show you on the hard disk where you have made it a black space called Unallocated. This space is the size you have set before, and it is hard disk memory that is not partitioned. This is the memory that we will use later to install the Linux distro.
Do you need to disable Secure Boot?
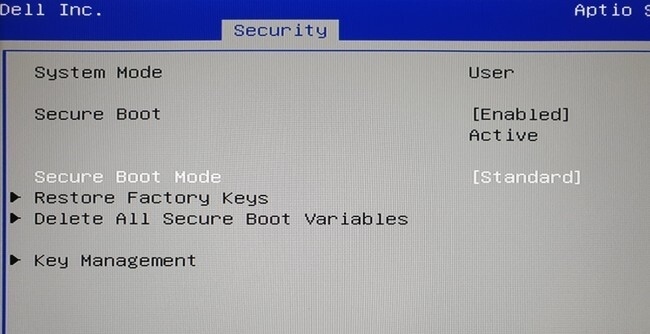
One factor to consider when choosing a distribution is whether it can work with Windows Secure Boot protection. It is a protection that makes sure that no strange applications are run before Windows starts, and that it can block the launch of some linux distros. Distros such as Ubuntu are already adapted to work with this protection, but if you are going to use another, you should look in its documentation if it is prepared for it.
In the event that you want to use a distribution that is not prepared for Secure Boot. Of course, keep in mind that the decision to allow deactivating the mode depends on the manufacturers, so it is possible that there are cases and computers in which you cannot do it directly.
Install Linux Mint on USB
Now you have to create a bootable USB or executable with GNU / Linux, with Rufus and the distro that you have downloaded. To do this, run the Rufus app. Inside, above you have to choose the USB drive that you have connected to the computer to do this, and then click on Select to choose the file of the GNU / Linux distro that you have downloaded, in our case Linux Mint.
Once you have chosen the distro and it is loaded in Rufus, click on the START button to create the executable USB. Here, when you click on Start, Rufus will show you some dialogues, in which you have to accept everything he tells you. Don’t worry, it is a very well pre-set application, and all it asks and recommends will be standard settings so that everything works out correctly.
Install Chrome OS on your computer

Once you have it prepared, you have to start the computer from the USB that you have prepared with Linux Mint. To do this, turn off the PC, connect the USB and turn on the computer by immediately pressing the key that launches the drive selector to boot. Generally this should be F12, but depending on the BIOS and the PC it can be others such as F1, F8, F9, F10, TAB or ESC. When you see the menu, select the bootable USB drive and hit Enter to boot your computer through it.

When you do this, you will go to a screen where the computer will give you to choose from which drive you want to boot it. On this screen, you have to choose the USB drive with Linux Mint that you have connected and press Enter. By doing this, you will tell the computer that instead of booting through the hard drive, which is what it always does, boot directly using the USB as the primary drive.
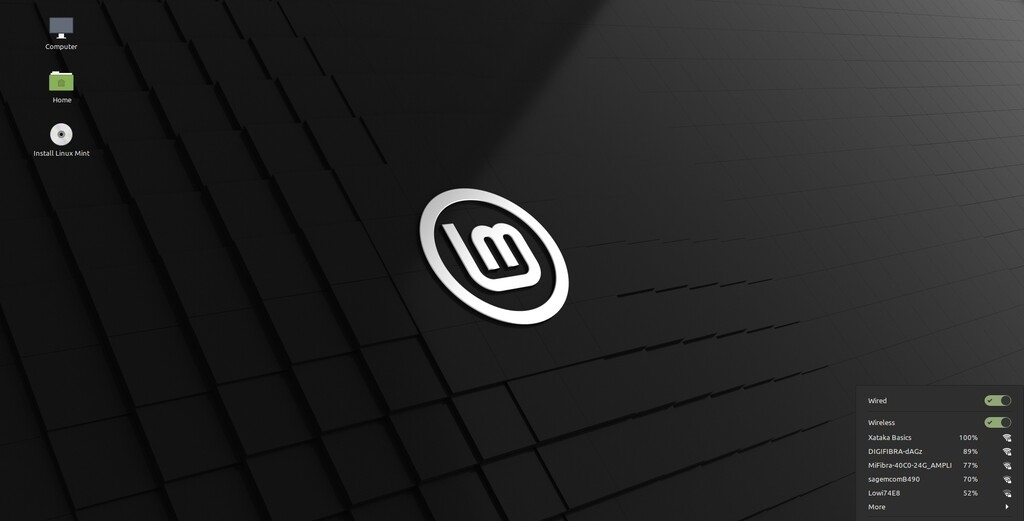
The first thing you will see is the Linux Mint welcome screen, where you will also be offered several options. In these options, what you should do is choose the Start Linux Mint option, which means to start Linux Mint. This will cause you to boot the entire operating system from USB.
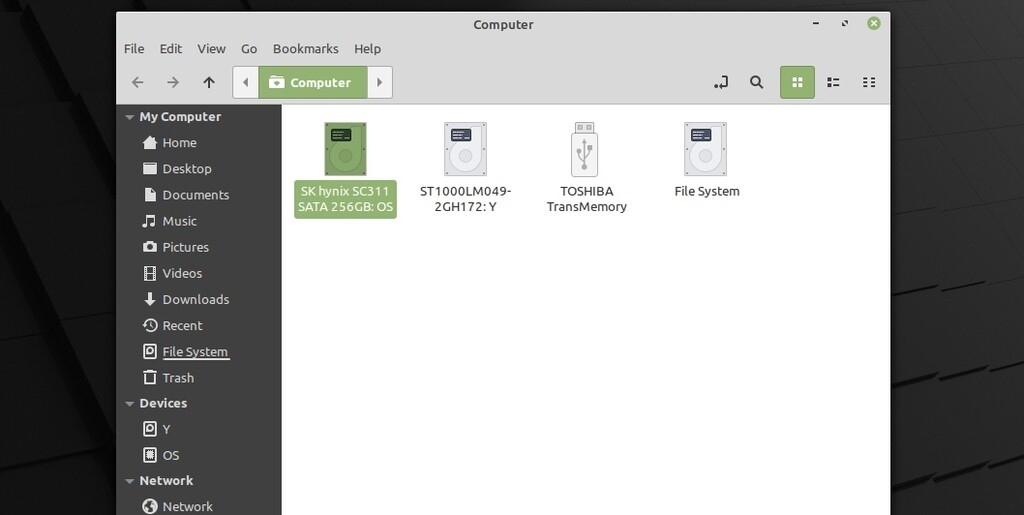
Once inside Linux Mint, the first thing you will have to do is connect the operating system to the Internet, since the process with Chrome OS will require it. Click on the connection button, choose your WiFi in case the computer is not connected by cable, and write the password.
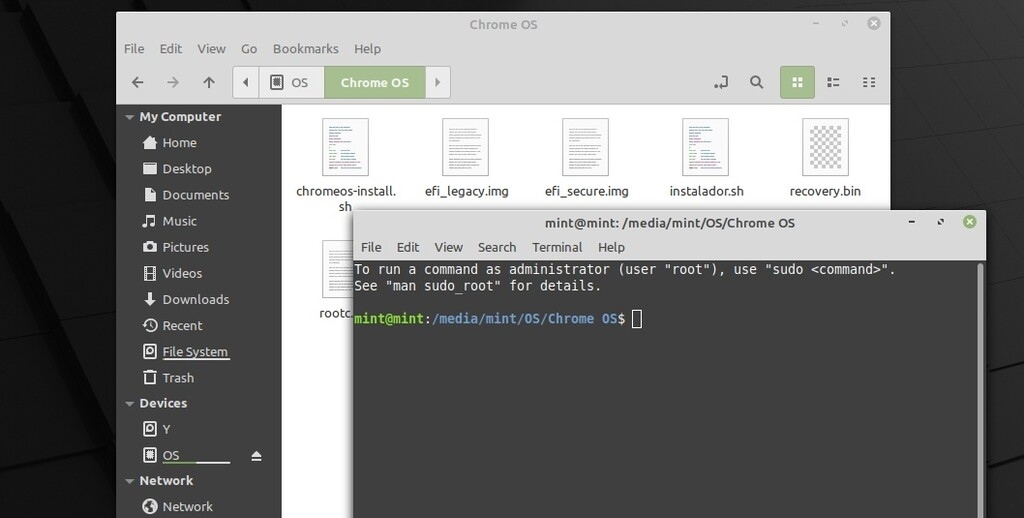
Next, on the Linux Mint desktop you have to open the Computer folder. You will see that several elements appear with strange names, which are the hard drives that you have connected to the computer. What you should do is open the folder on your main hard drive, to be able to browse its elements.
Once inside the folder belonging to the hard disk, you have to access the Chrome OS folder that we have created before, in order to use the files that we have in it from Linux Mint. When you are inside the folder, right click on the background, and click on the Openin Terminal option, which will open the terminal having navigated directly to the Chrome OS folder.

Next, you have to write the following commands one after the other :
- sudo su
- sh installer.sh
With the first of these two commands, you will give yourself something very similar to Windows administrator permissions. And the second command, what it does is run the script to create the Chrome OS image. You will see that when you write the last one, letters will begin to appear in the terminal, indicating that it is working.

After a few seconds the process will pause and it will ask you a question. If you want to use additional space. What you will have to do is press the Y key and press Enter to say yes.
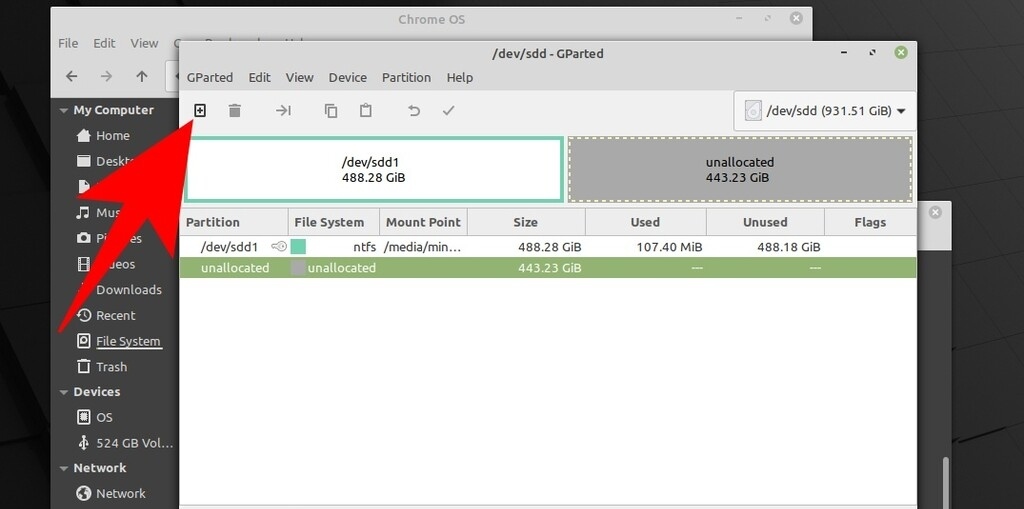
When the process is complete, the Gparted application will open, which is the Linux Mint partition manager. In this program, you have to select the partition of space that we have freed before, which will appear as unallocated as it is not assigned to any site. When it is selected, * click on the button to create a new partition ** that you have at the top left, with the plus symbol.

You will go to a partition creation screen. By default almost everything is ready, all you have to do is change the File system parameter choosing ntfs as the file system. Once you have done it, click on the Add button to add the partition.

Once you have done this, you will return to the Gparted screen, where you must apply the changes. To do this, click on the ✓ accept button that you have in the upper bar, and when it asks you if you really want to confirm the changes, confirm them by pressing the Apply button to apply them.

Once the process is finished, click on Close to close the window and you will return to Gparted, where you can now see the partition with its new name and formatted. What you have to do now is copy the name of the partition, which is the one that appears on the far left after / dev /. In the screenshot, the name is sdd2, but you can have a different one. If you double click on the partition, you will go to its properties where you can copy it.

Now, close Gparted. When you do, the terminal will display the message Enter the partition name. What you have to do is paste or type the name of the partition for Chrome OS, which is the one we have looked at in the previous step. Paste or handwrite it, and hit Enter to continue. When you do, you will be asked if you want to format, and you must type an s and press Enter to say yes.

The Linux Mint terminal will now go to work on the process of creating and installing the Chrome OS image on the partition you have chosen. This process may take a few minutes, although you will see progress at all times.

When finished, comes a delicate part. You will see that above you have a lot of code that you may not understand, but you have to copy a part of this code. Specifically, you must paste everything between menuentry “ChromeOS (debug mode)” { and the symbol }. Come on, what’s inside the brackets.
Now, go back to the Chrome OS folder, where you have to create a new blank document. There, right click on the background and click on Create New Document, and then on Empty Document. A document will be created that you have to call code.txt. Double click on it and choose the Display option to open it, and inside you have to paste the code of the Linux terminal that we have copied before, the one that was between the braces or brackets.
This is a code that you will need later to be able to start Chrome OS from the beginning of the computer, using the tool that we will tell you next. It is a different code for each person depending on the partitions and hard drives, and if you have copied it into a document inside the Chrome OS folder in C:, it is because now you will have to go to Windows and be able to access it.
Now, prepare dual boot
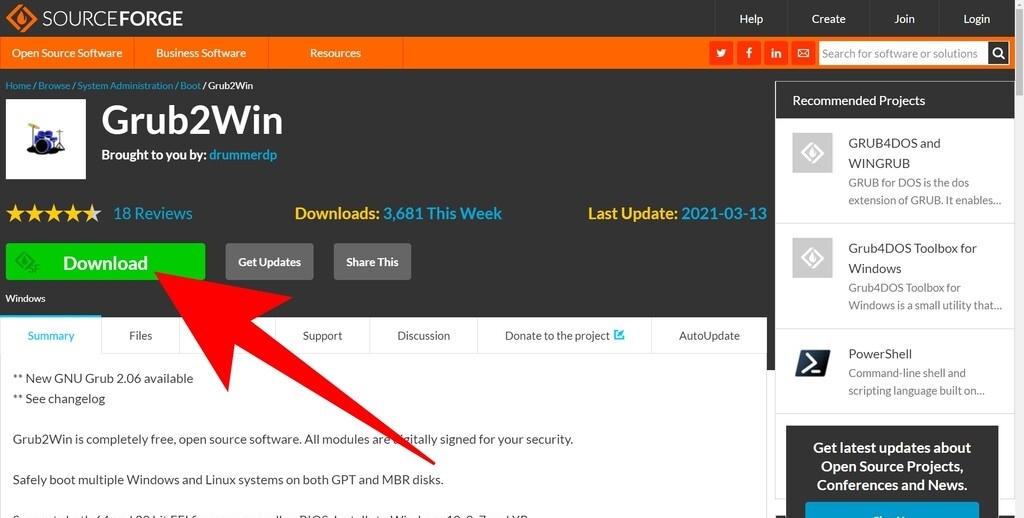
When you have saved the code that the installation gave you in the Chrome OS folder and in txt format, you have made sure you can access it from Windows. You will need it to configure the dual boot of the system in Windows 10. To create this start, you have to download an application called Grub2win, which you can find at this address on SourceForge, one of the best known websites for uploading open source applications.
A compressed file will be downloaded, and you must unzip it. When you do, run the setup.exe file to launch it. You will not have to do much, since the download process is automatic. Then, you will go to the screen where you are going to configure the installation. In it, you just have to choose the hard drive where the program will be installed, and decide if you want to launch it when it finishes and if you want a direct access. After choosing this, click on the Setup button to proceed.

When it finishes installing, click the Return button to the Setup Menu, and then the Close button. The installation will complete and the program will open. What this program does is configure Grub, which is the operating system selector. Thus, you will be able to choose between the several that you have on your hard drive instead of always starting with Windows.
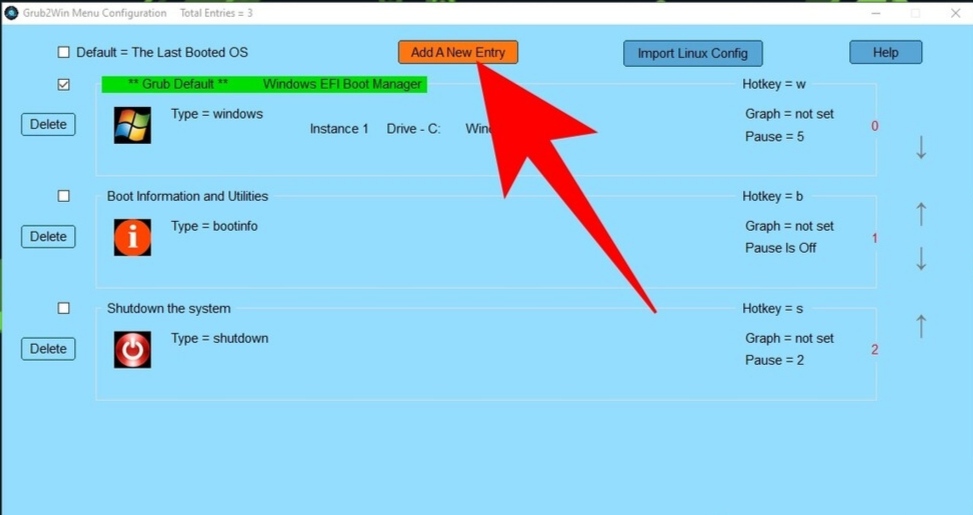
On the main screen of Grub2Win you have to click on Manage Boot Menu, and you will go to the options to configure the boot. In this configuration screen, click on the Add a New Entry option, which is used to add a new item to the start menu that will appear to you to decide with which operating system you will start the PC.
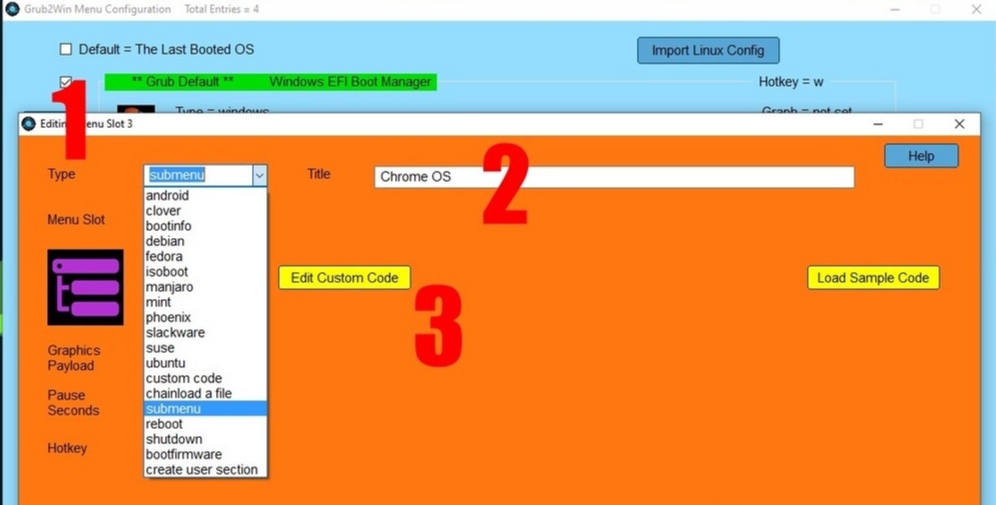
When configuring the new Grub menu item, first you have to choose the submenu option (1) in the Type section. Once you have done it, in Title you put the name of Chrome OS (2), so that it appears with that name in the operating system choice menu. Now, click on the Edit Custom Code button (3).

This is important. When you click on Edit Custom Code, a notepad will open, and in it you have to copy the code that you have saved in the code.txt file that we have created before in the Chrome OS folder. We have saved the code in that file in Linux Mint, but when saving it in a C: folder it is accessible from Windows.

When you save the code in the file that the program opened for you, you will see that back in the window from before, this code will already appear in the element’s configuration window. What you have done is copy the address you need to run Chrome OS from Grub, and you only have to click on the Apply button to apply the changes, and then OK. This code is different for each person.
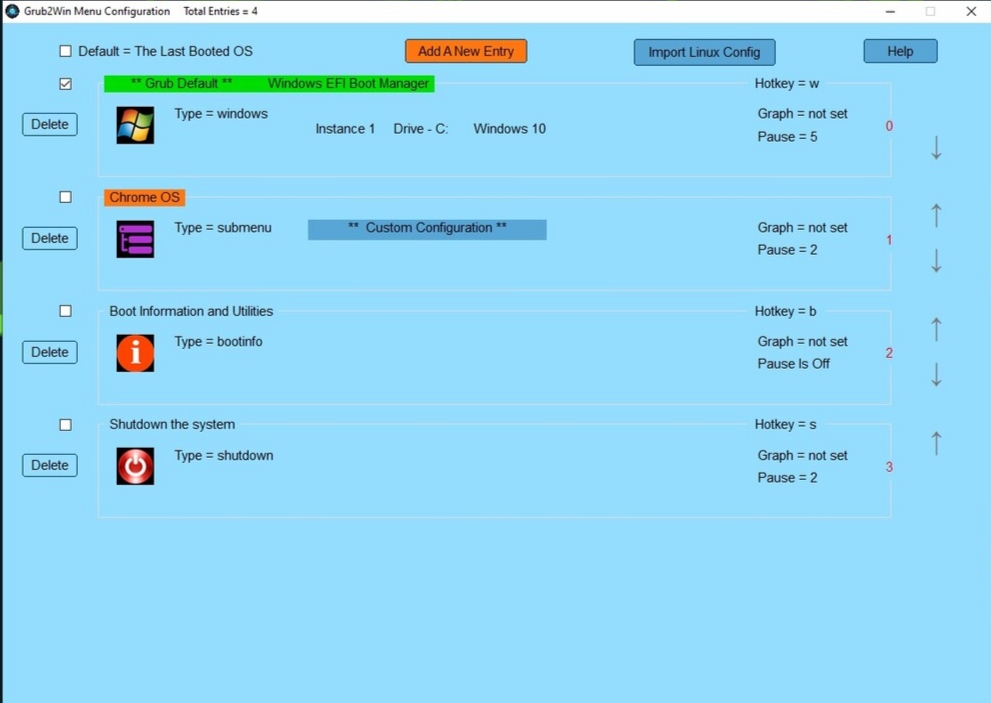
You will return to the previous window, where you can see all the elements of the Grub. Here, you can change the position of the elements with the arrows on the right. Chrome OS can be placed just below Windows, since it is more organic than putting it at the end under the shutdown option. When you have it, click on Apply, the window will close going to the previous one, where you must click on OK to accept everything, and at the end on Close to close.

And the process is finished, now you just have to restart Windows to see the launcher that shows you the choice of operating system. In this Selection Grub, you will have to select Chrome OS. In case you get an error, you may need to press F12 or the corresponding key to manually choose the grub to start the computer.

And that’s it. Once Chrome OS is launched, the first time you will have to configure it, and then you can choose it normally. Keep in mind that you must have chosen a recovery file compatible with your computer at the beginning, that is, if with the advice that we have given you do not find the right one, you will have to experiment until you find it.
In Technoeager | Top 10 Free Video Editors for Windows 10 PC