This time we are going to introduce ADB, which stands for Android Debug Bridge. Our intention is not to go into much depth, but simply to show how to get it working on Windows and Linux and some things that can be done with it. In other words, it is more of an introductory material than an advanced technical tutorial, although it is true that it can be a bit difficult if you do not have some prior knowledge of how to deal with a command console.
What is Android Debug Bridge (ADB)?
In short and for simplicity, ADB is a command line tool that allows a Windows, Linux or Mac computer to communicate with an Android device. It allows you to do a wide variety of actions on the Android device, including sending files from the computer, copying files present on the Android device, debugging applications, installing and uninstalling packages, and provides access to a Unix shell.
It also allows you to restart an Android device in the standard way, in recovery mode, bootloader (boot loaded) or by performing a previous sideloading process (transferring files between two local devices, which is usually done when you want to change the Android of the manufacturer for a custom ROM), in addition to allowing you to carry out many other actions.
As we can see, ADB is quite versatile, although, at least with Google’s official tools, it requires some basic knowledge of command lines to use it.
How to download and run the Android SDK for Windows
The logical thing is to access the web for Android developers, but on its home page what is made available by default is not the bare SDK, but the entire stack for application development through the Integrated Development Environment (IDE). ) official: Android Studio.
Android Studio is built on the technology of JetBrains and is a very capable IDE, but it defeats the purpose of this introductory tutorial by serving far more than is necessary. As an alternative, we will download the “peeled” SDK, which can be obtained via the following path :

Then the terms and conditions of use will appear, which the user will have to accept if he wants to start downloading the Android SDK (it seems that the website has a bug at the moment).
Once the file has been downloaded in ZIP format, you have to access the ‘platform-tools’ subdirectory that should have appeared (in case of carrying out the extraction process with the tools of Windows itself, it may be necessary to go down one more sublevel) after unzip it, press the key combination ‘ctrl+L’ and copy the path that you extracted the file.
After copying the path of the Windows 10 File Explorer, we proceed to open a PowerShell console and type the following , but without pressing enter:
cd ""
After typing the “skeleton” of the command, the path obtained from the Windows file explorer is pasted between the quotes . It is important to note that “Guillermo Puertas” is the user used for this tutorial, so this may change. The use of quotes is to prevent spaces from breaking the command.
cd "C:\Users\Guillermo Puertas\Downloads\platform-tools"
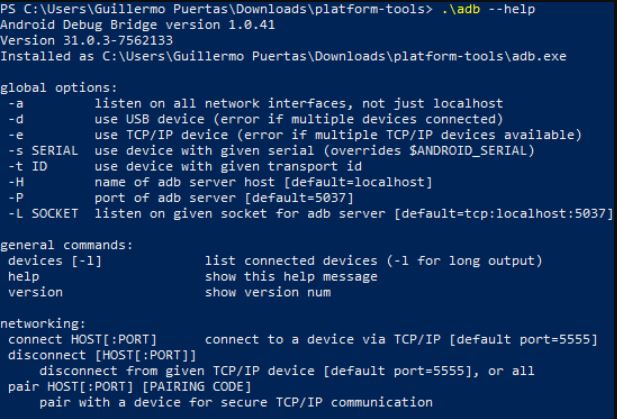
To check if ADB is available, it is enough to run it with the help argument and see if it is displayed or if some kind of error appears.

.\adb --help
Modifying the user’s PATH in Windows
Since getting the path where the Android SDK is located over and over again ends up getting tiresome, you can alternatively add its location to the user’s PATH. To do this you have to open the advanced system settings of Windows 10.

In the window that appears, whose title is “System Properties”, click on the “Environment Variables” button located at the bottom of ” Advanced Options “.

In “User variables for YOUR USER” (Guillermo Puertas in our case) you have to select the ‘Path‘ variable and click on the “ Edit ” button.

Finally, the user must click on the “New” button , paste the path where the Android SDK is located in a new line, click on the enter key, click on the “OK” buttons in the “Edit variable of Environment” and “Environment Variables” and close everything to carry out a system restart.

After following all these steps, the user should be able to use ADB right after opening the PowerShell console, so instead of typing this:
\.adb
You can directly enter the following:
adb
How to get ADB on Linux
Obtaining ADB on Linux, if you use the repositories of the distributions, is easier than on Windows. Basically, all you have to do is install the package that contains the Android SDK tools. The fact that you are using the command line also simplifies the process.
Package to install on Ubuntu 20.04 LTS (and possibly later versions) and Debian 11 Bullseye :
sudo apt install android-sdk
In case the installation gives problems, it is likely to be solved with the following command:
sudo apt --fix-broken install
Package to install on Fedora Workstation :
sudo dnf install android-tools
Package to install on Fedora Silverblue and Kinoite (in this case it is necessary to restart):
rpm-ostree install android-tools
Package to install on Manjaro (where it may be pre-installed) and Arch Linux :
sudo pacman -S android-tools
After installing the corresponding package, ADB should already work integrated in the system’s PATH, without the need for further configuration. To check it, just show the help.
adb --help

“Bonus track” for Linux users
In case of trying to restart the mobile in ‘bootloader’ or ‘recovery’ mode with ADB from Linux, the user may find that they do not have sufficient permissions to carry out the action. This is fixed by adding a udev rule for the Android device in use.
First connect the Android device via USB and run the following command :
lsusb
In our case, the connected smartphone has been recognized as if it were a Google Nexus or Pixel device, despite actually being a POCO X3 PRO. From the line corresponding to the smartphone, the first part of the identifier is copied, the one that appears to the left of the colon in the sixth column.

Then you have to open or create the following file with a plain text editor and administrator permissions. In our case we mention Gedit because it is graphical and pre-installed in Ubuntu, but the user can use Nano, Vim or whatever he wants:
sudo gedit /etc/udev/rules.d/51-android.rules
Enter the following line in the file, but changing the identifier to that of the Android device that is connected to the user’s computer.
SUBSYSTEM=="usb", ATTR{idVendor}=="IDDISPOSITIVO", MODE="0666", GROUP="plugdev"
After entering the rule, we proceed to save the changes, close the file and restart the system for it to take effect and thus be able to restart an Android device in ‘bootloader’ or ‘recovery’ mode.
Enabling developer mode and USB debugging on an Android device
To make use of ADB you have to start developer mode and activate Android USB debugging. The steps are essentially the same on all mobile phones and tablets that use Google’s operating system, but their order may vary due to the fact that its Open Source nature allows major modifications to be made. In our case we have used a Redmi 9 PRO, which follows the lines set by Xiaomi.
The first step is to open the System Settings and click on “ About phone ”.

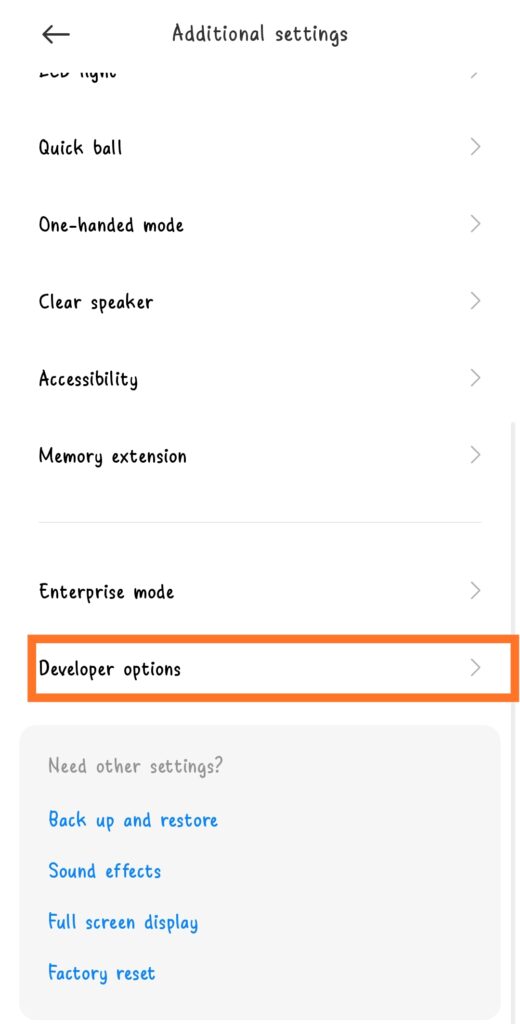
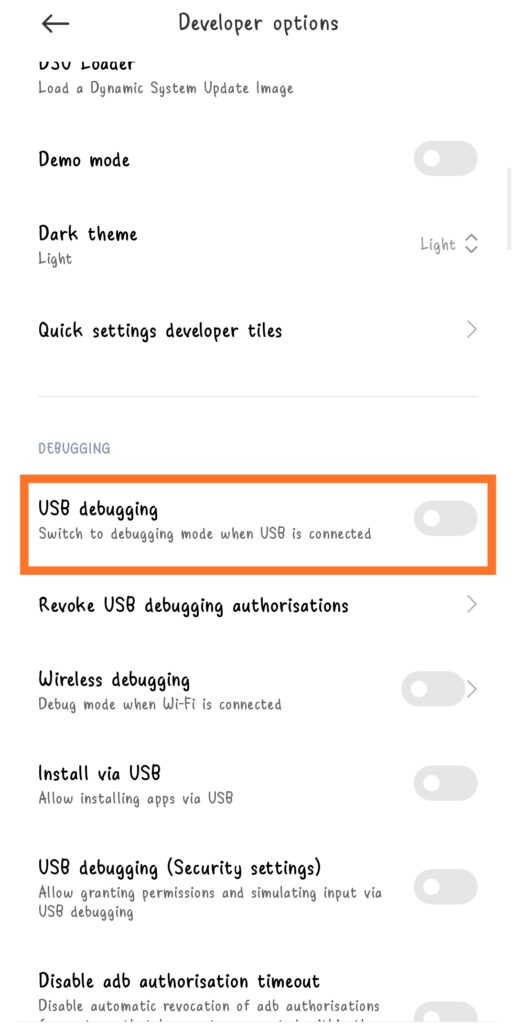
With developer mode already activated, it’s time to enable USB debugging. To do this you have to go back to the main Settings screen and go to Additional settings> Developer options> USB debugging.

Additional Setting 
Developer Option 
USB Debugging
After activating the switch to enable USB debugging, a confirmation screen will appear that the user must complete correctly.

When connecting the Android device via USB the fingerprint should appear to enable USB debugging. Obviously, the answer to the question must be affirmative.
After following all these steps, you should be able to proceed to use Android Debug Bridge.
How to make use of ADB
Making a basic use of ADB (remember that this is an introductory tutorial) is easy if you have some notions of how to use a command line. From here we will assume that the Windows user has added the Android SDK to their PATH. In case you haven’t done it, at the beginning of the commands, instead of putting ‘adb’ you have to put ‘.\adb’, in addition to having to access beforehand through the command line the location where the SDK of Android.
To show the connected Android devices , the command to execute is the following:
adb devices
Although there are easier ways to do this since the Android user’s directory subtree can be mounted as a storage drive, it is possible to push a file from the computer with the ‘push’ argument . ‘screen1.png’ is the file located on the computer that you want to send to the POCO mobile, while ‘/storage/self/primary’ is the root of the user’s internal storage. It’s important to note that, initially at least, you can’t send a file to any Android subdirectory due to permission issues.
adb push pantalla1.png '/storage/self/primary'
The ‘pull’ argument allows you to retrieve a file stored on the Android device . In this case we have downloaded a document about AMD’s IBS features located in the ‘Download’ folder, which is located just below the root of the user’s internal storage.
adb pull '/storage/self/primary/Download/AMD_IBS_paper_EN.pdf'
To restart an Android device in the standard way with ADB, the following is executed:
adb reboot
To restart in ‘recovery’ mode the command is this:
adb reboot recovery
And the following to reboot into ‘bootloader’ mode :
adb reboot bootloader
To access the ADB Unix shell you have to enter the following:
adb shell
If the user sees that ADB is not working properly, a possible solution is to kill the server and start it again:
adb kill-server
adb start-server

